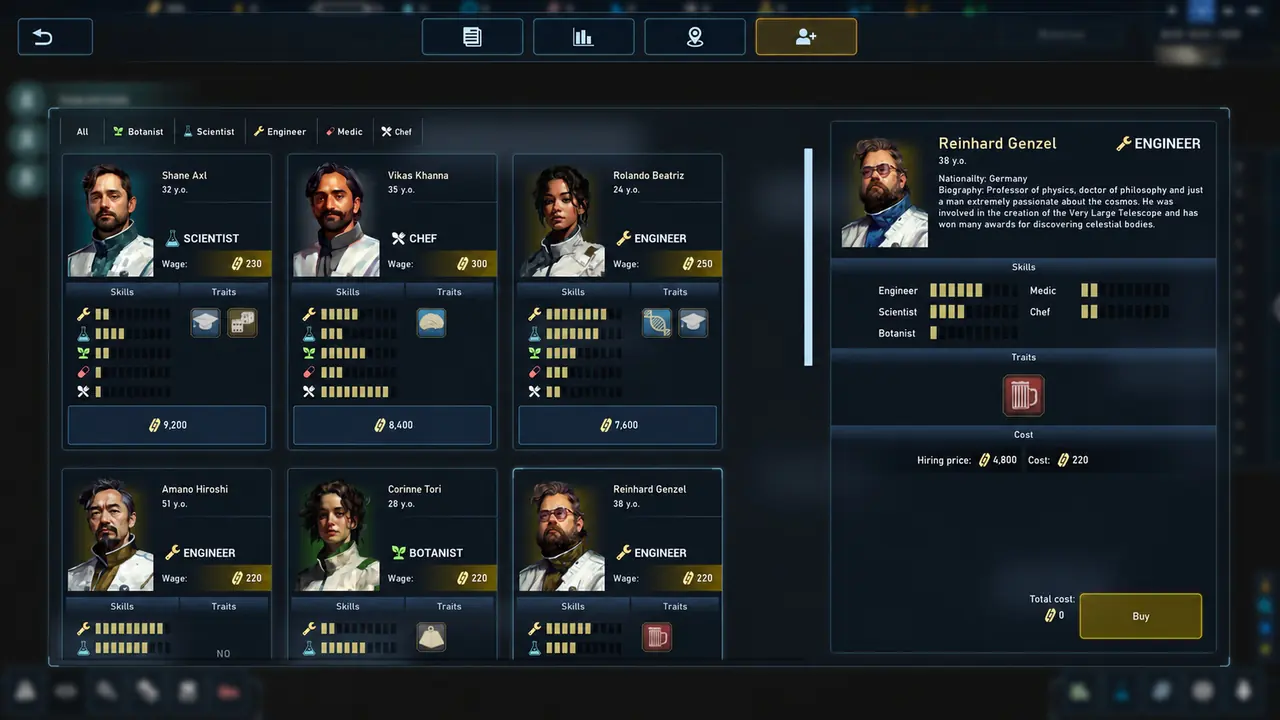
Five professions, each shown as a filter tab on the official hiring screen: Botanist, Scientist, Engineer, Medic and Chef. Every colonist carries all five skill tracks but specialises in one, and you pay two numbers to recruit them — a one-off hiring price and a recurring cost that matches their wage. Since 1.0, wage policy affects morale, and morale is what decides whether a colonist stays. Hire for the job you actually have, not for the highest number on the card.
- Professions
- FiveBotanist · Scientist · Engineer · Medic · Chef
- Housing supported
- Over 180Per official 1.0 text
- Recruitment cost
- Two figuresHiring price + cost
- Skill growth
- Work and trainingCourses at a Training Center
- Firing
- SupportedAdded in 1.0
- Quitting
- PossibleMorale-driven
The five professions, read off the interface
This is the one part of the game where the official material is better than any community summary, because the store page includes a full-resolution screenshot of the hiring screen. The filter tabs across the top of that panel are the game’s own list:
All · Botanist · Scientist · Engineer · Medic · Chef
That is the complete classification, and it is worth stating plainly because community pages disagree with it. The community wiki’s Colonists page lists the same five roles but names the fifth Cook rather than Chef. The official interface says Chef, in the tab, on the card badge, and in the skills matrix on the detail panel. When the game and a wiki disagree about the name of a thing in the game, the game wins.
The same screenshot tells you what each role is for, because profession matches the module a colonist operates: a botanist works growing space, a scientist works labs, an engineer works production, a medic works medical modules, a chef prepares food.
The hiring panel, field by field
The detail panel on the right-hand side of the hiring screen exposes the full record for one candidate. Transcribing it is the fastest way to understand what you are buying:
| Field | What the official panel shows |
|---|---|
| Name and profession | The candidate’s name with a profession badge beside it |
| Age | Given in years |
| Nationality | A stated country of origin |
| Biography | A short written background for that individual |
| Skills | Five labelled tracks — Engineer, Scientist, Botanist, Medic, Chef — each drawn as a segmented bar |
| Traits | A separate slot, with an explicit indicator when a colonist has none |
| Cost | Split into a Hiring price and a Cost figure |
| Actions | A running total and a Buy button |
Two things in that table are easy to skim past and both matter.
Skills are per-track, not per-colonist. A colonist describes five separate bars, not one rating. The profession badge tells you which track they are currently assigned to; the matrix tells you what else they could do. That is why a candidate whose badge does not match your vacancy can still be useful.
Traits are a distinct category from skills. They occupy their own slot with their own tab on the card, and the panel is explicit when the slot is empty — candidates in the screenshot are marked with a plain “NO” where traits would appear. A colonist with no traits is not a blank record; it is a colonist with nothing extra.
Where the pool comes from, and why reputation matters
Hiring is not an unlimited catalogue. The 1.0 announcement explains the constraint and the reason it was relaxed:
“Hiring colonists allows you to house over 180 specialists at your base, but our most active players began to run out of available personnel. That’s why we’ve added 33 new unique colonists. Unlike the others, these newcomers have a lower hiring cost and a smaller salary, letting you bring in affordable specialists and train them in whichever skills are most relevant to you.”
Three separate facts are compressed into that paragraph, and each has a practical consequence:
- The supported roster scale is over 180 specialists. This is a large-colony game. Base layout and life-support capacity should be planned with a population far bigger than the handful you start with.
- The pool is finite. “Running out of available personnel” is a real state that active players reached. You cannot hire an unlimited number of any given profession on demand.
- The cheap tier exists deliberately. The 33 additions are explicitly described as lower hiring cost and smaller salary, intended as affordable specialists you then train up. An earlier update added 11 more on the same principle. If your early game feels like every candidate is unaffordable, you are looking at the wrong end of the catalogue.
There is a fourth lever, and it is one people miss because it is not on the hiring screen at all. An official patch note states: “The pool of colonists offered for hire now depends on reputation.” Reputation is a campaign system, so in practice your roster ceiling is tied to how you play the story — not purely to your bank balance.
Skills, levels and the Training Center
Skills are not fixed at recruitment. Three separate official systems move them:
| Mechanism | Official wording |
|---|---|
| Working off-base | “Colonist experience now grows while working at Outposts” |
| Paid training | The 1.0 announcement describes a Training Center where you “improve your colonists’ skills”, send staff off, “pay the corresponding cost”, and after a while they “return with upgrades to their chosen profession.” |
| A defined ceiling | An achievement is awarded for a colonist reaching “the maximum level for that profession” — so professional skill is levelled, with a maximum |
Read together, these describe a colonist as an investment rather than a purchase. Hiring a low-skill candidate at a low wage is not a compromise; it is the intended cheap route, because the same colonist becomes a specialist later. Conversely, paying a premium for a high-skill specialist is buying time rather than capability.
The Training Center is worth understanding as a point of interest rather than a module you build — the announcement describes it as a POI where you send colonists. That means using it involves logistics and a temporary absence from your workforce, not just a budget line.
Salaries, morale and the exit door
The 1.0 announcement’s “Firing and salaries” section is short and unusually direct about consequences:
- You can fire any colonist you do not want.
- You can control the salaries of the whole crew.
- Salaries affect team morale.
- And: “colonists can now quit on their own and leave on the next capsule if working conditions become truly unbearable.”
The design intent is visible in the ordering. Salary control is offered as a management tool, morale is named as its consequence, and quitting is named as the consequence of morale. That is a closed loop, and it means a base can lose population as a direct result of a wage decision made several hours earlier.
The capsule detail is the part worth internalising. Departures are not instant: a colonist leaving waits for the next capsule. That gives you a window — but only if you are watching morale, and only if the underlying working conditions change.
Housing quality feeds the same pool. The community wiki notes that colonist productivity and mental state improve with more pleasant living and working quarters, and the developer’s 1.0 room-finish system exists in that spirit. Treat habitation quality as a workforce-retention cost rather than a cosmetic one.
Quality-of-life details that prevent false alarms
A cluster of official fixes in this area are all variations on “the interface was lying to you”:
- A hunger icon above a colonist could persist too long after the need was met.
- Colonists assigned to a module but not currently at their post now display with more transparent portraits — so a colonist being shown at a module they are walking toward is distinguishable from one actually working there.
- Colonists in transit (sitting in a truck, not assigned to an expedition) were missing from the personnel list entirely.
- Free units — those not assigned to any module or route — now sort to the top of their list.
If you have ever concluded that a colonist was slacking, hungry or missing and turned out to be wrong, one of these fixes is probably the explanation.
Hiring decisions, in order of what actually bites
| Decision | Do this | Why |
|---|---|---|
| What to hire first | Match profession to the module that is idle | A colonist cannot operate a module outside their profession |
| What to pay | Compare hiring price and wage separately | Only one of the two is recurring, and the recurring one compounds |
| Whether to buy cheap | Yes, then train | Cheap low-skill hires are the documented intended route, via Training Center courses |
| Where to send new staff | Outposts, for experience | Experience grows while working at outposts |
| When to let someone go | Before morale becomes unrecoverable | Departure is delayed by one capsule, not cancelled |
| How many to plan for | Over 180, eventually | The supported roster scale is far above what a first base looks like |
What this page does not claim. No per-colonist prices, no wage ranges per profession, no experience-per-hour values and no skill-level thresholds. The interface screenshot gives you the fields; the developer has never published the numbers behind them, and every hotfix rebalances them anyway. A cost table copied from a store screenshot on an unknown build would be wrong more often than right.